- Everything in your life was fine and then one day when you decided to Archive your Xcode build as usual ... BAM! ... out of the blue, the end result turned out to be weird / different one than usual.
-
It almost seems wrong and on closer inspection you can surely tell that what used to work
- had the archive type "ios app archive"
- whereas the newer strange build results has the archive type "generic xcode archive"

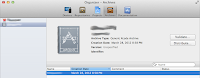
- The reason this is happening is because you've added a new framework(s) for which you need to edit the Target > Build Settings and set the Skip Install setting to Yes. Afterwards the "Archive" process will start producing normal end results again.
Showing posts with label xcode. Show all posts
Showing posts with label xcode. Show all posts
Wednesday, March 28, 2012
Wrong Archive - "ios app archive" vs "generic xcode archive"


Monday, March 26, 2012
Upgrade from Xcode 4.2 to 4.3
- After installing Xcode 4.3 via the App Store you may feel like you're finished.
- But the process is not yet complete and you'll be surprised if you keep using the Xcode icon in your dock to launch, as there will be no apparent changes to Xcode.
- As pointed out in this blog, the key is to continue the installation process by opening the newer Xcode via Spotlight. Once the additional components installation is finished, you will have the option to uninstall old Xcode installations like 4.2, which you should most definitely make use of!
- Afterwards if you make use of the agvtool, and you run into some problems because of cornercases that the installer does not address ... you could have used instructions from http://doronkatz.com/upgrading-to-xcode-43-and-solving-the-develop ... but they seem to have been taken down :(
- If you are facing problems with MacPorts, then that may be because:
- you need to update to MacPorts 2.0.4
- or even if you've done that, the particular "port install foo" may need to be done via the workaround prescribed here: https://trac.macports.org/wiki/ProblemHotlist


Monday, August 8, 2011
Versioning iPhone App: Beta & Production Builds
A little bit of Google search yields the following great resources to help get started in the arena of versioning your iOS apps:
- easy-iphone-application-versioning-with-agvtool
- recipe-automatic-version-number-build-number-build-date-handling
- setting-ios-application-build-versions
- attempt to provide the grand total of everything I learned from these articles which are based in XCode3,
- provide instructions on how to do the same in XCode4, and
- explain some of the finer points which weren't clear to me without trial & error.
- This snapshot shows how to add apple generic versioning to your XCode4 project.
- Open YOUR_PROJECT in XCode 4 and navigate to YOUR_PROJECT > Targets > YOUR_PROJECT > Summary > iOS Application Target > Version
- Even though it may seem intuitive to think so but this is NOT the version number that the iPhone app users will see.
- Instead this is an internal build number that you can increment as many times as you like and whenever you deem appropriate. Follow the links at the top to learn more.
- You can easily comfirm this by attempting to edit this property in YOUR_PROJECT > Target > YOUR_PROJECT > Info (maps to YOUR_PROJECT-Info.plist file) > Custom iOS Target Properties > Bundle Version
and then confirming that the change took effect again in Summary > iOS Application Target > Version
- If you Ctrl+click and ask it to Show raw keys/values
- Then you'll notice that this maps to the key: CFBundleVersion
- If you would eventually like to build your "About" page in the app and format a string that shows up something like version 0.1.0 (build 42), where 42 will correspond to the value of CFBundleVersion, then instead of giving it an initial value like 1.0, I would suggest setting it to 1
- So now what corresponds to the 0.1.0 part of the version 0.1.0 (build 42) in your about page? Well, the Bundle versions string, short property with the raw key value of CFBundleShortVersionString would make up the 0.1.0 piece of that string.
- And could this 0.1.0 be the version # that is displayed as your app's version in the App Store? Yes! this is known as the marketing version and it is what shows up to the users of the App Store.
- What's up with the x.y.z version structure? As one of the links in the beginning explains, X - major revision number, Y - minor revision number, Z - maintenance or patch release. This is a very nice & simple concept to use.
- Why should the starting of an App's marketing version be from 0.1.0? Because an application would like to enter the App Store as 1.0.0, so you don't want to use 1 as your major (X) version in the very beginning when you are probably in the process of distributing Ad-Hoc builds for alpha/beta testing. 1 as your minor (Y) version makes sense 0.1.0 because your app starts with the smallest set of features and then grows to perhaps 0.2.0, 0.3.0 and so on. Also the 0 as your patch (Z) version makes sense because there is nothing for you to patch at the very start. In conclusion: minor.major.patch is conveniently 0.1.0 for starters.
- Here's what my email notification message looks like when I use TestFlightApp to publish beta builds to testers: v0.1.0 (4) of ShoppinPal is ready for a TestFlight
- To check your CFBundleVersion via Terminal, use:
agvtool what-version
- All the following commands increment CFBundleVersion by 1 but do nothing to CFBundleShortVersionString:
agvtool next-version
agvtool next-version -all
agvtool bump -all
- To check your CFBundleShortVersionString via Terminal, use:
agvtool what-marketing-version
- To change CFBundleShortVersionString, you will yourself have to understand if the change is major, minor or patch and then use:
agvtool new-marketing-version 0.2.0
- With XCode4 there really shouldn't be any good reason not to use Git so remember to commit to the repository every time after you change the version. Perhaps even take the time to tag the repo so that you can pull the exact source for debugging if someone ever reports an issue against a specific version/build #


Wednesday, July 20, 2011
Using Git, XCode4 and Unfuddle together
- With XCode4 supporting Git out-of-the-box it is highly encouraging to know that any endeavor that you "the developer" might embark on ... will benefit from a default development branch (on your local box) known as master repository (unless you explicitly de-select a checkbox in XCode4 when creating your project).
- As your single-developer project gains a coherent enough form for you to want to share it with other developers ... Unfuddle will pop into the picture because it provides: (a) Git hosting, and (b) it is free for upto 2 developers. This is the perfect setup for figuring out if Git and XCode4 are the right fit for you.
- A lot of folks who make use of GitHub hosting (your source code is open to the world) seem to be concerned about how XCode4 doesn't live up to their expectations because it doesn't provide an automated process or any clear cut instructions for configuring and pushing the local master-repo over to a remote upstream repository (lets call it origin-repo) when this phase in their development life-cycle finally arrives.
- Well the instructions over @ Unfuddle couldn't be more direct and clear-cut, they get the job done in under 10 minutes flat. They are suited exactly for a project where a local master-repo already exists and you want to push it to a remote origin-repo.
- After the push setup is completed and your team member has cloned the origin-repo onto their own dev machine as a master-repo, you are ready to roll.
- Lets say the n00b member makes a change to their local files. They can quickly find out what has changed using
git status
- Now the n00b wants to commit the changes, then they can use
git commit -m "comment"
- But wait, this only committed the changes to the local master-repo on the n00b's machine, next to get this pushed over to the origin-repo use:
git push git@subdomain.unfuddle.com:subdomain/abbreviation.git
... where subdomain and abbreviation must be replaced with values appropriate to your account and repository. - Now lets say you realize that it doesn't make much sense to have the *.xcodeproj files/folders under source control as their contents might differ based on the machine they are on, well then:
git rm --cached <file>
would remove file from version control, while keeping it in the working repository. And to avoid from ever mistakenly adding it back to source control, just add a .gitignore file and inside it put the expression to ignore the file/folder in question.
- Then use
git commit -m "comment"
for putting the change into master-repo - And
git push git@subdomain.unfuddle.com:subdomain/abbreviation.git
for pushing the change to the origin-repo - Finally use
git pull git@subdomain.unfuddle.com:subdomain/abbreviation.git
to get everything back over to your own local master-repo - Some common tasks that may crop-up once you move to a multi-dev env could be simple things like wanting to rename the project. For XCode4 this was a particularly simple yet difficult find for me. Apparently according to Konstantin Salavatov: in XCode4 clicking on the project name after selecting it, starts the process of renaming it. This is absolutely correct.
- Here's a set of links to keep close at hand for quick reference:
- http://www.arlt.eu/blog/2009/12/01/importing-iphone-keys-p12-and-pem-into-snow-leopards-keychain/
- https://git.wiki.kernel.org/index.php/GitCheatSheet
Tuesday, July 19, 2011
TestFlight Fever
I recently heard about TestFlight and I became extremely excited. Now having never done any ad-hoc distribution for iPhone apps in the past, I thought that I had hit the jackpot! I quickly signed up, sent invites to my team members and then rushed to upload a build ... so that everyone could start testing instantly :)
But oh boy was I in for a surprise. TestFlight became a victim of my false expectations:
In conclusion TestFlight rocks out loud and hopefully I've covered any novice errors that would have otherwise prevented others from thinking likewise.
But oh boy was I in for a surprise. TestFlight became a victim of my false expectations:
- False expectation # 1: I don't have to maintain the profiles for the folks that I invite for testing my app via TestFlight.
- WRONG! The 1st thing that TestFlight warned me about was the fact that it could not accept my build because I was probably using a distribution profile. Now since a dist-profile doesn't have a record for any of the devices from my team members, it wouldn't work. So TestFlight warned me about this and told me to go perform my build with an Ad-Hoc profile.
Falseexpectation # 2: TestFlight will clearly document and guide a novice like me how to setup an Ad-Hoc configuration in XCode4.
- UPDATE! They now prompt you with an informative link that will give you all the help you need.
WRONG! While they may make a welcome improvement in the future, I could not find any help on the immediate TestFlight site... but just like any good engineer of the Google-era I was able to find an excellent article on the web for it that got me past this hurdle.
- False expectation # 3: Just this one time, I can get away by faithfully following the instructions of other folks and not having to bang my head bloody w/ trial & error.
- WRONG! The XCode4 + Ad-Hoc distribution configuration article got me off to a flying start but I quickly realized that I had no idea how to create an Ad-Hoc profile.
- After mucking about I figured out the steps are:
- Goto iOS Provisioning Portal
- Select Provisioning from the left pane
- Select the Distribution tab from the right
- Click the New Profile button
- Make sure to mark the Ad Hoc bullet option as the distribution method.
- Select all the Devices that can use this profile.
- Download and install this new profile and prepare your build with it.
- False expectation # 4: Any TestFlight teammates who accept their invites and whose devices weren't explicitly added as a part of the Ad-Hoc profile at the time of its creation ... will be injected into the Ad-Hoc profile auto-magically.
- SUPER WRONG! You have to go edit you Ad-Hoc profile and add the devices yourself. TestFlight does NOT commandeer your Apple provisioning account to do this for you.
- What TestFlight DOES offer us (the users) is the ability to easily collect the UDIDs of our fellow teammates. Think about it, having your teammates get an email that they open via their iPhone/iPad ... and which results in their UDID being shuttled over to a central location in TestFlight for easy collection is already a huge boon! Perhas the only boon one should be asking for :)
- Gone are the days of running around looking for a computer so that you can connect to iTunes and painstakingly jot down an impossibly long identifier.
- Anyways, make sure to add the UDIDs for all of your team members as they accept the invites and sign up. Collect them from TestFlight and go update your Ad-Hoc profile as & when needed ... by adding and then selecting the decives for inclusion by marking the checkboxes under the Devices section of the Ad-Hoc profile.
In conclusion TestFlight rocks out loud and hopefully I've covered any novice errors that would have otherwise prevented others from thinking likewise.
Wednesday, July 13, 2011
Integrating with ZBar SDK 1.1
It took only 35 minutes to get a barebones scanning app up & running on the iPhone with ZBar SDK. As far as I'm concerned ZBar is a pretty good rival to RedLaser. If you haven't done already, head over to this section in the ZBar SDK docs and try out the example which will have you singing its praises in no time.
I followed it word for word other than the fact that I used UILabel instead of UITextView.
I followed it word for word other than the fact that I used UILabel instead of UITextView.
Sunday, July 10, 2011
Integrating with RedLaser SDK 3.0.0
If you've had the chance to try out the RedLaser app on your iPhone, then you know its usability is excellent and it is simply the best technology out there when it comes to scanning bar codes. As such, you may be rightfully tempted to download their SDK and try it out for yourself.
Now even though you'll find their out-of-box documentation in the 6MB-ish download to be enlightening, you may find yourself struggling and without any instructions when it comes to getting any project of you own up & running other than their RLSample project. I must say that the ZBar folks do a much better job of documenting similar integration items for their barcode scanning SDK. I just hope that the newly released RedLaser SDK 3.1.1 build1 will offer better docs than the Redlaser SDK 3.0.0 build21 that was used at the time of writing this blog entry.
Also you may feel dubious about purchasing the extremely expensive license without first figuring out if you have the skills to take your idea all the way. And you can't get into their forums without getting a license. So, I've put together some highlights to help you grapple with the SDK and get to a point where you can perform trial & error on your own to see if you have the right stuff :)
Now even though you'll find their out-of-box documentation in the 6MB-ish download to be enlightening, you may find yourself struggling and without any instructions when it comes to getting any project of you own up & running other than their RLSample project. I must say that the ZBar folks do a much better job of documenting similar integration items for their barcode scanning SDK. I just hope that the newly released RedLaser SDK 3.1.1 build1 will offer better docs than the Redlaser SDK 3.0.0 build21 that was used at the time of writing this blog entry.
Also you may feel dubious about purchasing the extremely expensive license without first figuring out if you have the skills to take your idea all the way. And you can't get into their forums without getting a license. So, I've put together some highlights to help you grapple with the SDK and get to a point where you can perform trial & error on your own to see if you have the right stuff :)
- Add files to "<your project>"...
- Navigate to wherever you downloaded and extracted the RedLaserDevSDK-3.0.0build21
- The naming is not set in stone, it is spelled out here only to give you a feel for what you may be looking for on your mac.
- Drill-down into the RedLaserDevSDK-3.0.0build21/Sample/ folder and select the RedLaserSDK directory
- Make sure to select the checkbox to Copy items into destination group's folder(if needed)
- Also select the bullet option which will Create groups for any added folders
- Just to see if you can get anything simple to work on your own, you may try to run the build after pasting the barebones code from the Using the 3.0 RedLaser SDK.pdf file included with the SDK download.
- Here's the code to throw into a method of your choosing:
BarcodePickerController *picker = [[BarcodePickerController alloc] init];
// Let's keep things simple by using the default built-in overlay
//[picker setOverlay:customOverlay];
[picker setDelegate:self];
picker.orientation = UIImageOrientationUp;
[[UIApplication sharedApplication] setStatusBarHidden:YES];
[self presentModalViewController:picker animated:TRUE];
[picker release];
- Ofcourse you'll need to add #import "RedLaserSDK.h" at the top where you've pasted this code.
- But the build still won't go through because some frameworks need to be added for the build to succeed.
- Here's the code to throw into a method of your choosing:
- Goto <Your Project> > TARGETS > Build Phases > Link Binary With Libraries > +
- libRedLaserSDK.a - XCode would have probably automatically placed this in the list when you imported the ./RedLaserDevSDK-3.0.0build21/Sample/RedLaserSDK directory.
- CoreVideo.framework - makes sense since we need to the camera is used to perform the scans. If you started with something like 24 errors, adding this will bring them down to 18.
- Security.framework - If you started with something like 18 errors, adding this will bring them down to 3.
- libiconv.dylib - If you started with something like 3 errors, adding this will bring them down to 0.
- In addition you should add an empty implementation for what happens when a barcode is successfully read.
- Here's the code:
- (void) barcodePickerController:(BarcodePickerController*)picker
                   returnResults:(NSSet *)results
{
    [[UIApplication sharedApplication] setStatusBarHidden:NO];
    [self dismissModalViewControllerAnimated:TRUE];
}
- Here's the code:
- With this you can at least do a test build and run in the simulator mode which will not do much other than throw up the mock scanner screen from RedLaser.
- If you actually try to plug in your iPhone and directly test your app on the device you will run into a whole new slew of build errors! I received a total of 22 errors. Once again, goto <Your Project> > TARGETS > Build Phases > Link Binary With Libraries > +
- libRedLaserSDK.a - XCode would have probably automatically placed this in the list when you imported the ./RedLaserDevSDK-3.0.0build21/Sample/RedLaserSDK directory.
- AVFoundation.framework - If you started with something like 22 errors, adding this will bring them down to 6.
- CoreMedia.framework - If you started with something like 6 errors, adding this will bring them down to 0.
- Now with a lot of luck and a little bit of elbow grease, when you connect your iPhone then build & run you app, you should see it launch and have the default RedLaser full-screen camera-view-like overlay being shown. All you will see is what you camera sees, no fancy buttons ... no nothing. But given that you never actually invoked any camera/media related functionality yourself, have faith in the fact that you've cleared the first phase in your experiments to integrate with RedLaser.
- Before beginning the 2nd phase, I had hoped to perform a simple experiment that would turn out as described below ... but that didn't happen so until I figure that out, this is it :(
- Remembering that there are an extremely limited # of scans allowed w/ RedLaser SDK ... take the iPhone over to a barcode and try to scan it ... given the barebones code that we've talked through thus far, all that should happen is that the camera overlay screen will just disappear after a successful scan and you'll be left looking at an empty plane white view that had loaded this stuff to begin with.

Subscribe to:
Posts (Atom)